Tuesday, October 2, 2012

Day 18 - Cleaning Microfiber

This is probably by far my most favorite Pinspiration because it saved my furniture.  Not just saved it, it made it look brand new.  When I found this pin, I was really excited and hopeful that it would work because we'd been using slipcovers to cover up how dingy the furniture got.  I admit I did this pin a while back because I was desperate to get our furniture looking like new.  However, I had to call upon it again after I was eating a cupcake on the couch and dropped a lump of frosting on the arm of the couch.  Oopsies!


Here was the offending stain beforehand.


I put some rubbing alcohol in a spray bottle and applied it.  Then I rubbed it in with a beige-colored sponge.


Greasy frosting stain gone!  

When I originally did this pin, I did the entire seat and back cushions, as well as the arm rests.  It took me a couple of very large bottles of rubbing alcohol and a couple days to do it all because you have to let one side dry before you do the next.  You need to really saturate the fabric and you also have to make sure that you use a sponge that is either white or the same color as your furniture.  The alcohol could transfer color if you use something that isn't colorless or similar colored.  Our couches were absolutely disgusting when I first attempted this.  There were blue water marks from spilled vase water (dyed flowers were in it), formula, spit-up, drool, sweat....they were gross. Once I saw it worked on the couches, I also attacked the gliding rocking chair that I thought I ruined when my son was about 3 weeks old and spit up all over it.  The rubbing alcohol really worked on every stain I applied it too, so much that even my husband was impressed.  Ever since, he's been hesitant to make fun of me and my obsession with Pinterest.  :)

Day 17 - French Dip Croissants


This recipe was SO good, my husband made me open a second tube of croissants to make him more.  I like finding recipes that are quick, easy, and tasty.  Both my husband and I are out of the house between 11 and 13 hours a day on weekdays, which makes eating a reasonable hour difficult at times.  A 13-month-old ruling our lives, makes eating at a reasonable hour a requirement. 

Source: mamalovesfood.com via Erin on Pinterest


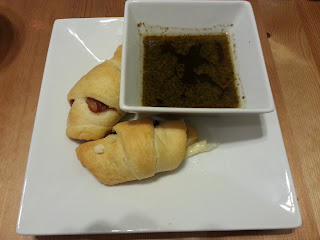
I really like sandwiches, and I’ve mentioned before that my husband’s favorite food is a sandwich.  When I saw this pin, I was a bit hesitant that my husband would like it because he tends to lean more towards chicken or turkey with mostly obscure toppings on his sandwiches.  Google Chicago Bagel Authority (CBA), he’s a regular there and will often order a lottery, which is whatever the sandwich maker wants to put on it barring any restrictions you give them (for example, neither of us likes ham). Anyway…I thought this might be a tad boring for him because the sandwich consists of a croissant, a thin spread of horseradish (my favorite dressing for a sandwich!), a slice of roast beef from the deli counter, and a small cube of sharp provolone.  See the pictures below.


I used the reduced fat croissants and I saved some additional time by not making my au jus but by asking the deli counter for some.  I baked my sandwiches according to the croissant package instructions 350 degrees for 13 minutes.  While they were baking I heated up the au jus. 


Here’s how the turned out!  We will definitely be making these tasty treats again.


Day 16 - Homemade Sugar Scrub

Handmade gifts are the best kind of gifts.  I think taking the time to make something is always more valuable to me than just buying something.  I've been trying to think of a way to thank a couple people in my life for the things they do for me, ways they support me, and time they give me.  I couldn't think of a better way than to make something that would make them feel a little pampered and special.


I found this pin this week and thought I would try it out.  I was a bit skeptical because it was just 2 ingredients, but my skepticism was for naught because this really turned out great.  After I was done mixing them, I tried some off the spoon and not only did I like the way the soap smelled, my hands were very smooth and soft! I will definitely be passing this treasures along as little thank you gifts. I may even make them in a couple months when our son transitions to the Toddler Room (OMG!) for the teachers he had in the infant room.


I got a 4 pack of 1/2 pint ball jars from Target.  They were about $5.00


I bought a new bag of sugar because I wasn't certain exactly how much it would take or that I had enough in my cupboard.  That was about $3.00.


I picked out a Dawn with Olay moisturizers in it according to the Pin's instructions.  I picked purple because I liked it better than the peachy pink, and lavender is one of my favorite scents.  The Dawn was about $5.00.


I filled up the jars most of the way with sugar.


Then I topped them off with the soap.


I mixed them up and just kept adding sugar little by little until it was a pasty consistency I wanted.


Then I put the lid on and tied a little ribbon!  So cute!

Day 15 - Carrot Chips

Honestly, I had my doubts about this one, and I my intuition was correct.  It seemed simple enough, right?  Thickly peel or thinly slice some carrots, toss it in olive oil and salt, bake at 350 for 12 minutes.  Simple.  It seemed like something to try for a quick, healthier snack after work/school. 


Okay, so I don’t know what kind of peeler allows you to peel “thick” slices of carrots, but I apparently don’t own one.  Annoyance number one.  Instead of thickly peeling, I had to thinly slice with my chef’s knife.  I enjoy cooking and baking, but as my husband can attest, I am not the most skilled with chopping, slicing, dicing….you get it.  This aspect made me nervous.


First I regularly peeled my carrots, and then I painstakingly sliced them as thin as I could.  You can see I wasn’t always very successfully at maintaining the length of the carrot.  I took my slices and laid them on a parchment paper-lined cookie sheet (maybe this was my demise?).


I covered in olive oil, salt, and pepper, baked for 12 minutes at 350 and…..


Got soggy, salty, carrot slices.  Not carrot chips at all.  Pinterest….fail.

Day 14 - Mess-Free Painting for Toddlers

When I saw this, I was excited to try it with Remi.  My Mom is a pre-school teacher, and I always loved seeing what kinds of projects she would come up with for her kids to do either for fun or as gifts for their parents.  My experience at my son’s school so far is there isn’t much emphasis on artwork or creativity.  I know he’s only 13 months, but there are a lot of fun things you can do with kids this age, even if they don’t quite grasp what they are doing yet.  Anyhow, I think creating art is important, and it’s an important part of growing up for kids.  I always needed a creative outlet when I was growing up, whether it was drawing, writing, or crafting something up, I needed the ability to create something from nothing, or nearly nothing.  I guess that sort of explains this blog….doesn’t it?


This wasn’t just a Mommy and Remi activity, Daddy got involved too, which was great! 


This pin was pretty easy to execute because I already had everything I needed to do this.  Like I said, I am creative, I have lots of things around to create things at random. 
I found a piece of white paper, but you could use anything.  I put it in the large, freezer size Ziploc bag.


I added paint, Bears colours for fun! I taped it down to the tray of Remi’s high chair and just added Remi!  Mike and I had to help him a bit, and looking back I think I would probably add more paint to the baggie, but it really was mess-free fun for the entire family.  I’m sure we’ll be repeating this activity again and maybe even figuring out ways to hang this artwork around the house.  Pinterest probably has some sort of solution for that… J


Wednesday, September 26, 2012

Day 13 - T-Shirt Headband

More uses for old t-shirts.  Awesome!  No-sew...not exactly.  I hand stitched this project, but the instructions said you could glue it.  I wouldn't recommend that.  I thought this was a neat idea, could make a cute gift, and could come in handy those days you want a pony tail for running errands, but have some little baby hairs you want to keep out of your face. When I first pinned this, I was fooled by the "no-sew" promise and how cute the project seemed, but quickly learned otherwise when I clicked into the link.


I found an old maternity shirt in a pretty light blue color and began to cut away.  5 strips per the instructions.


Then I hand-stitched them together at one end.


Then I stretched out the strips the same way I did for my t-shirt scarf.


Next, I started braid/weaving according to the instructions in the link.  It was pretty easy once I got going and could see the pattern I was making with the strips of fabric.


I stitched together the other end and joined it with the first end I stitched.  Then I looped another piece of fabric and hand-stitched it per the instructions.


The headband took me about 20 minutes to complete, not long at all. I think I need to get to a thrift store and find some old tees in fun colors to make some more of these and more t-shirt scarves too!


Day 12 - Homemade Carpet Cleaner

If I can find a way to get anything in my house cleaner without having to use harsh chemicals or things that cost more, I am all for it.  I have a board on Pinterest dedicated just to Tips and Tricks where I keep these kinds of ideas to try.  The carpet in our townhouse is atrocious.  It was disgusting when we moved in and it's been a struggle to clean over and over again. We're not terribly rough on our house either, so it's a testament to how cheap and nasty the builder-grade crap is that they install when you don't get the upgrade (Thanks previous owners!).

The carpet in our basement is especially gross.  Especially, after last year I threw a birthday party for my husband.  We had a bonfire in our driveway and beers were spilled in drunken sloppiness.  This led to wet, ashen covered shoes making their way into our house to use the bathroom.  Gross.  Two cats, a toddler, beer, friends, movie nights...you get the idea.  We live in our basement, and the carpet is proof.

I thought I would try this Pin out at first and if I found success, I'll attempt bigger stains on a weekend when I have more time.  I would say I found success.

So I didn't really measure anything out.  I just poured some hydrogen peroxide in a bottle, squirt some dawn soap in it and swirled.  Then I took a beige sponge and went to work.

Here's the before...


Here's the after...


Needless to say, I'll be attempting this on larger sections of yucky cheap carpet.